How to Build and Publish Your Android App on Google Play Store (2026)
Publishing your custom Android app on the Google Play Store might feel overwhelming, especially with Google's updated requirements for 2026. The good news is that the process does not have to be complicated. Whether you are a first-time developer or an experienced builder, this step-by-step guide walks you through exactly how to build and publish an Android app on Google Play Store, from setting up your developer account all the way to hitting that publish button.
The Google Play Store hosts over 2 million apps and remains the dominant distribution platform for Android applications. To reach users worldwide, publishing on the Google Play Store is absolutely essential. In fact, the platform enforces specific rules and procedures to protect users and ensure app quality. Understanding these requirements before publishing saves significant time and prevents rejections or account penalties.
As of August 31, 2026, all new apps and app updates submitted to Google Play must target Android 16 (API level 36) or higher. Apps that do not meet this requirement will be blocked from submission and may become invisible to new users over time.
From development to Play Store approval, our experts ensure your app is secure, compliant, and built for growth.
Talk to Our Android ExpertsBefore your Android app can appear on the Google Play Store, it must be digitally signed with a certificate. And here's why: this isn't optional—it's a fundamental security requirement that Google enforces for every single app submission.
Android uses two signing keys: an upload key and a release key. Let's break down why this matters:
The upload key verifies that you're the legitimate developer making updates to your app. Google Play Store uses this key to confirm your identity and prevent unauthorized changes.
Once Google Play receives your Android App Bundle (AAB), the system automatically re-signs it with your release key, which is what end users download. Note that new apps must be submitted as an AAB, not as a plain APK file. Essentially, this dual-key system protects both you and your users; developers can't lose access to their apps, and users can't download compromised versions.
Importantly, for maximum security in 2026, Google recommends using cloud-based key management via Google Play App Signing. This approach means Google securely stores your release key, significantly reducing the risk of key compromise. It's genuinely the smarter way to protect your app and your users.
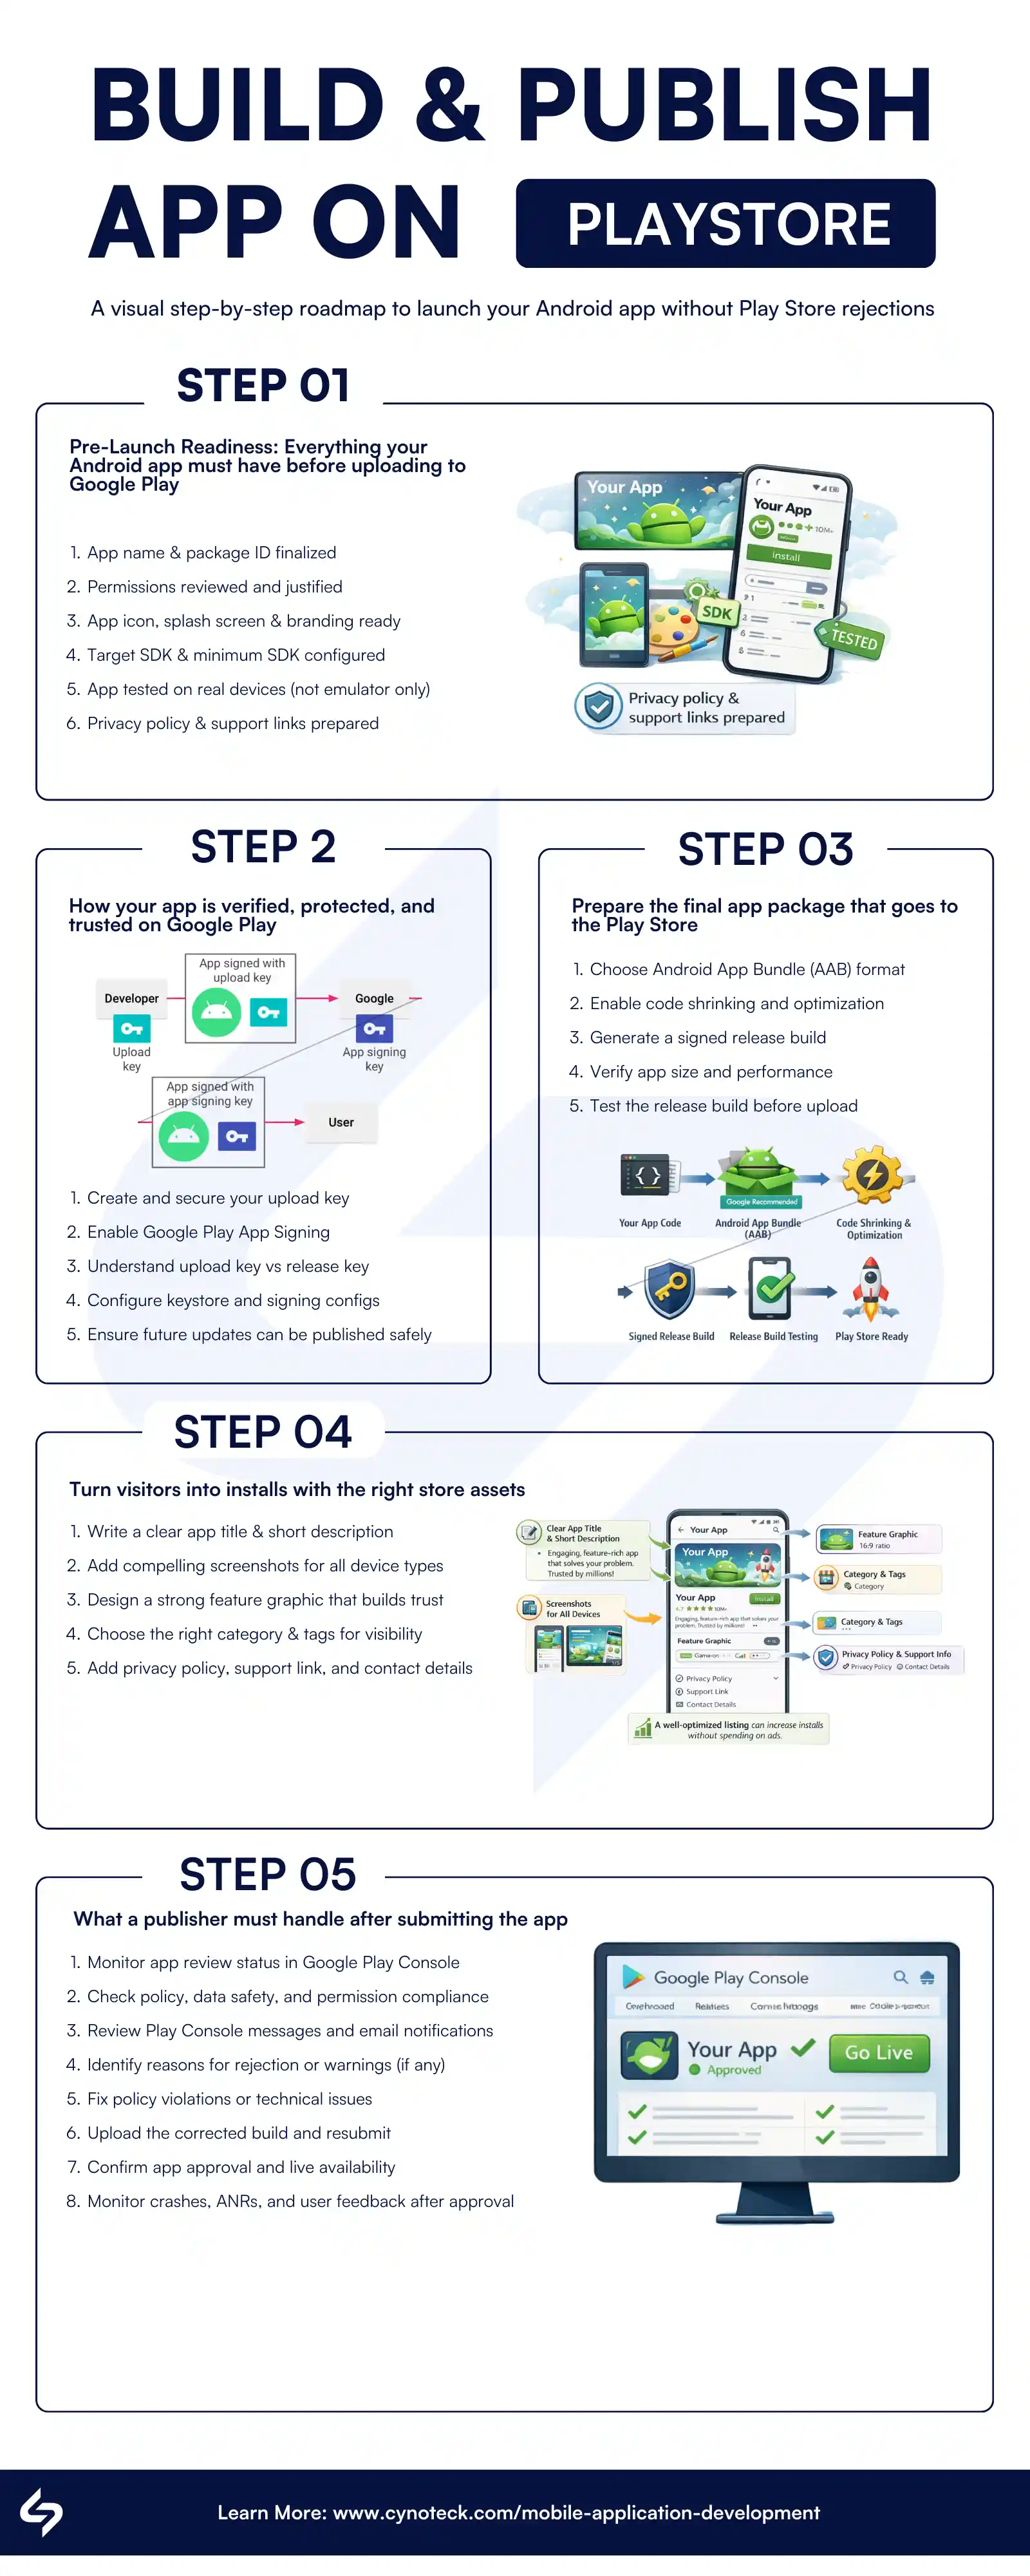
Download info-graphic PDF here: Roadmap to Build and Publish Android App
Getting your Custom Android App from development to millions of users requires more than just writing great code. You need to master the technical requirements, security protocols, and submission processes that the Google Play Store enforces. This section walks you through each critical step to ensure your app not only gets approved but also stands out in a marketplace of over 2 million applications.
Your app's launcher icon is the first visual impression users get. Truth is, a default icon won't stand out on home screens. Fortunately, if you're using Flutter for mobile app development, the flutter_launcher_icons package makes the whole process much easier.
Otherwise, here's what you need to do: review Google's Material Design guidelines, place your icons in [project]/android/app/src/main/res/ mipmap folders, update the android: icon attribute in AndroidManifest.xml (e.g., @mipmap/ic_launcher), and finally test on a device to ensure it displays correctly.
In 2026, Material Design 3 (Material You) is the standard for Android apps. However, how you implement it depends on your tech stack.
It’s important not to mix Flutter, XML themes, and native Android configurations without clarification. Below are the correct approaches based on development type.
Instead of hardcoding a specific Material library version (which becomes outdated), use the latest stable version or manage dependencies properly. In your app/build.gradle:
dependencies {
     implementation "com.google.android.material:material:<latest-stable-version>"
}
Avoid locking to a specific version like 1.12.0, as it may become outdated and lead to compatibility issues. Next, update your theme in:
res/values/styles.xml
<style name="Theme.MyApp" parent="Theme.Material3.DayNight.NoActionBar">
     <!-- Customize your theme here -->
</style>
Better dynamic color support
Improved typography
Modern component styling
Better dark mode handling
Most modern android apps developers now use Jetpack Compose instead of XML layouts. In that case, you don’t need traditional XML themes. Instead, add the Compose BOM (Bill of Materials) to manage versions consistently:
dependencies {
  implementation platform("androidx.compose:compose-bom:<latest-version>")
  implementation "androidx.compose.material3:material3"
}
All Compose libraries stay version-aligned
No dependency conflicts
Easier upgrades
MaterialTheme(
    colorScheme = lightColorScheme(),
    typography = Typography(),
    content = {
      // Your UI here
     }
)
Faster UI development
Cleaner architecture
Better performance
Easier state management
Flutter apps don’t require Android’s Material Components dependency directly. Instead, you configure Material 3 inside Flutter:
MaterialApp(
  theme: ThemeData(
    useMaterial3: true,
  ),
)
Flutter already includes Material support, so adding Android's Material dependency in Gradle is unnecessary unless you're integrating native platform views.
Google Play increasingly evaluates:
UI consistency
Modern design standards
Proper theme implementation
Dark mode support
Apps that still use the legacy Theme.AppCompat risks looking outdated and may negatively impact user retention and ratings.
Modern UI compliance
Better accessibility
Dynamic color support
Stronger brand perception
This step is absolutely crucial—don't skip it or take shortcuts. Your signing keys represent your identity as a developer on the Google Play Store. Lose them, and you can't update your app. Share them publicly, and someone could impersonate you.
Create a keystore file if you don't already have one. Think of a keystore as a secure vault that stores your signing credentials. Importantly, you'll create this only once and use it for all future updates to your app.
Using the command line, run the appropriate command for your operating system:
keytool -genkey -v -keystore ~/upload-keystore.jks -keyalg RSA -keysize 2048 -validity 10000 -alias upload
keytool -genkey -v -keystore c:\Users\USERNAME\upload-keystore.jks -storetype JKS -keyalg RSA -keysize 2048 -validity 10000 -alias upload
The system will prompt you for information like your name and organization. These details appear in the certificate and add credibility to your app. The -validity 10000 flag means your key won't expire for approximately 27 years—more than sufficient for your app's lifetime.
Store your keystore file securely. The generated upload-keystore.jks file contains sensitive information. Keep it in a safe location with restricted access. Above all, never commit it to public repositories or share it via email.
Create a key.properties file to reference your keystore. In [project]/android/, create a new file named key.p
roperties containing:
storePassword=YOUR_PASSWORD_HERE
keyPassword=YOUR_PASSWORD_HERE
keyAlias=upload
storeFile=PATH_TO_YOUR_KEYSTORE_FILE
Replace the placeholders with your actual passwords and the full path to your keystore file. By doing this, your build system can access your keys without storing passwords in multiple places. Configure Gradle to use your signing configuration. Edit [project]/android/app/build.gradle. Before the Android block, add:
def keystoreProperties = new Properties()
def keystorePropertiesFile = rootProject.file('key.properties')
if (keystorePropertiesFile.exists()) {
    keystoreProperties.load(new FileInputStream(keystorePropertiesFile))
}
Then locate the buildTypes block and replace the existing configuration with:
signingConfigs {
release {
       keyAlias keystoreProperties['keyAlias']
       keyPassword keystoreProperties['keyPassword']
       storeFile keystoreProperties['storeFile'] ? file(keystoreProperties['storeFile']) : null
       storePassword keystoreProperties['storePassword']
} }buildTypes { release { signingConfig signingConfigs.release } }
This configuration helps all release builds automatically use your signing key, making things easier during development and submission.
R8 is Google’s official code shrinker and optimizer for Android apps. It removes unused classes and resources, optimizes bytecode, and obfuscates your code to make reverse engineering more difficult. In 2026, performance and app size directly impact:
Download conversion rates
User retention
Play Store ranking signals
Smaller, optimized apps perform better — especially in emerging markets where storage and bandwidth are limited. However, how R8 works depends on your development stack.
In native Android projects, R8 is enabled through your app/build.gradle file. Inside the buildTypes block:
buildTypes {
    release {
             minifyEnabled true
             shrinkResources true
             proguardFiles getDefaultProguardFile('proguard-android-optimize.txt'), 'proguard-rules.pro'
      }
}
minifyEnabled true activates R8 code shrinking and obfuscation.
shrinkResources true removes unused resources.
proguard-rules.pro allows you to define rules for libraries that require specific classes to be kept.
For debugging builds, you typically keep minifyEnabled false to simplify troubleshooting.
Flutter uses R8 internally when building release Android builds. To build with shrinking enabled (default behavior):
flutter build appbundle
If you temporarily need to disable code shrinking for troubleshooting, use:
flutter build appbundle --no-shrink
This flag applies only to Flutter builds — not native Android projects.
For react native android app development, use Gradle like native apps. In android/app/build.gradle:
buildTypes {
        release {
            minifyEnabled enableProguardInReleaseBuilds
            proguardFiles getDefaultProguardFile("proguard-android.txt"), "proguard-rules.pro"
     }
}
Ensure enableProguardInReleaseBuilds is set to true for release optimization.
Keep R8 enabled for release builds
Test your release build before publishing
Upload mapping files to Google Play Console
Uploading the R8 mapping file allows Play Console and Crashlytics to deobfuscate stack traces, making crash reports readable and actionable. Without mapping files, debugging production crashes becomes extremely difficult.
Reduces APK/App Bundle size
Improves cold start performance
Protects intellectual property
Improves security posture
In competitive markets, even a 10–20% size reduction can meaningfully improve install rates.
AndroidManifest.xml provides essential information to Android and the Google Play Store about your app. Clearly, incorrect values cause rejections or runtime failures. Update the app label in the application tag to display your app's correct name. Additionally, if your app requires network access, include:
<uses-permission android:name="android.permission.INTERNET" />
Notably, in 2026, Google enforces strict privacy policies. Simply put, only request permissions your app genuinely needs—excessive permissions trigger rejections and user distrust.
Your build.gradle (Module: app) file defines critical configuration values such as your app’s identity, versioning, and Android SDK compatibility.
Set a unique applicationId, typically following reverse domain format:
defaultConfig { minSdk 21 targetSdk 36 // Required: Android 16 (API level 36) from August 31, 2026 compileSdk 36}This ID:
Becomes your app’s permanent identity on Google Play
Cannot be changed after publishing
Determines your Play Store listing and update eligibility
Choose it carefully before your first release.
Inside defaultConfig:
defaultConfig {
        versionCode 1
        versionName "1.0.0"
}
versionCode → An integer that must increase with every release.
versionName → The user-visible version label.
Google Play uses versionCode to manage updates. If you upload a build with a lower or duplicate versionCode, it will be rejected.
SDK configuration controls which Android devices can install your app and how modern your APIs are.
defaultConfig {
      minSdk 21
      targetSdk 35   // Example – use latest stable API
}
Avoid hardcoding API 24 as a universal rule. In 2026:
Many apps still support API 21+
Lower minSdk increases reach in emerging markets
Higher minSdk simplifies development and improves security
Target audience device distribution
Google Play Console device analytics
Business goals
Feature requirements
If your audience uses mostly modern devices, you can safely increase it. Otherwise, keeping it lower improves install reach.
Google Play requires apps to target within one year of the latest Android version. As of August 31, 2026, all new apps and updates must target Android 16 (API level 36) or higher. Wear OS and Android TV apps are exempt and must target at least Android 15 (API level 35).
Failing to update your targetSdk will block new submissions and may hide your app from users on newer Android devices. Always set both targetSdk and compileSdk to the latest stable API level before submitting.
Always set:
targetSdk <latest-stable-API>
compileSdk <latest-stable-API>
This signals that your app is tested against current Android behavior and security changes.
Device compatibility
Play Store visibility
Security compliance
App performance
User reach
Choosing SDK values should be a business decision informed by analytics, not just a technical preference.
Google Play Console → Statistics → Device catalog
This shows what percentage of your users are on older Android versions. Enterprise teams typically review this data quarterly and adjust SDK levels strategically.
You have two main options for release builds: an Android App Bundle or individual APKs. Generally speaking, Google Play Store currently recommends App Bundles because they reduce download sizes for users while making distribution simpler for you.
Open your terminal and navigate to your project directory:
cd [project]
Then run:
flutter build appbundle
Flutter automatically creates an output structure with your signed App Bundle ready for upload.
Open your project in Android Studio
Go to Build in the top menu
Select Generate Signed Bundle / APK
Choose Android App Bundle
Select your signing keystore and choose the release build type
Click Finish
Your finished AAB file will be saved at app/build/outputs/bundle/release/app-release.aab
Run this from your project folder:
cd android && ./gradlew bundleReleaseYour AAB file will be at android/app/build/outputs/bundle/release/
Build your web project first, then run:
ionic capacitor build androidOpen the generated Android project in Android Studio and follow the native Android steps above to generate your signed AAB.
Quick reminder: Always build in release mode, not debug mode. Debug builds cannot be submitted to the Play Store.
flutter build apk --split-per-abi
This command generates separate APKs optimized for different processor architectures. Android devices automatically download the version that matches their architecture, saving users bandwidth.
Both approaches work fine, but App Bundles offer superior optimization. Ultimately, choose based on your specific requirements.
In 2026, Google strongly enforces the Play Integrity API, which replaces the legacy SafetyNet Attestation API. This API helps verify that your app is running on a genuine, unmodified Android device and installed from Google Play. It is especially important for:
Financial apps
Gaming apps
Apps handling sensitive user data
Subscription-based services
Apps that fail integrity checks may be restricted or flagged for fraud risks. If your app handles payments, authentication, or premium features, integrating Play Integrity is strongly recommended — and in some categories, effectively mandatory.
The Data Safety form in Google Play Console is one of the top rejection triggers in 2026. Every app must accurately declare:
What user data is collected
How the data is used
Whether data is shared with third parties
Whether data is encrypted in transit
Whether users can request data deletion
Importantly, you must also disclose data collected by third-party SDKs (analytics, ads, crash reporting, etc.). Incorrect or misleading disclosures can result in:
App rejection
Listing removal
Account suspension
Before submission, audit all SDKs and APIs to ensure your Data Safety declaration matches actual behavior.
Google heavily restricts access to sensitive permissions. Apps requesting these permissions undergo stricter review:
Background location access
SMS and Call Log access
Exact alarm permission
Accessibility services
You must:
Clearly justify why the permission is essential
Ensure the core functionality depends on it
Provide in-app disclosure to users
Unnecessary or poorly justified permissions are one of the most common rejection reasons. Always request the minimum permissions required for functionality.
Google Play requires all apps that include native code (NDK or third-party native libraries) to support 64-bit architectures.
Your app bundle must include:
arm64-v8a (required)
Optional: armeabi-v7a for wider compatibility
If you use third-party SDKs with native binaries, verify they provide 64-bit support. Failure to comply will block publishing or updates. Most modern build systems include 64-bit support by default, but it should always be verified before submission.
Professional Android app developers never publish directly to production. Google Play Console provides multiple testing tracks:
Internal Testing – Quick testing with up to 100 testers
Closed Testing – Controlled beta release
Open Testing – Public beta with feedback collection
Additionally, use:
Pre-launch report (automated testing across devices)
Firebase Test Lab for device testing
Crash monitoring before full rollout
If your Google Play Developer account was created after November 2023, you must complete a mandatory closed testing period before you can publish to production. This applies to personal accounts. Organization accounts are exempt.
Here is what you need to do:
Recruit at least 12 testers (aim for 20 to 25 as a buffer)
Ask each tester to actively opt in to your test track using the opt-in link from Play Console
Simply adding email addresses is not enough. Testers must click the link and install the app
Keep the test running for 14 consecutive days
Once complete, you can apply for production access in Play Console
This means new personal accounts should expect the full publishing process to take 2 to 4 weeks from account creation to going live.
Testing tracks help you:
Identify crashes and ANRs
Validate permissions and policies
Collect real user feedback
Reduce rejection risk
Publishing without proper testing increases the likelihood of negative reviews and ranking penalties.
To publish on Google Play, you need a Google Play Developer account. Here is what the process involves in 2026:
Go to play.google.com/console and sign in with your Google account
Pay the one-time registration fee of $25 (credit or debit card)
You must be at least 18 years old to register
Choose between a Personal or Organization account. Organization accounts have a stricter verification process, but give your listing more credibility with users
Provide a government-issued ID for a personal account, or a government-issued ID plus a D-U-N-S number and an official organization document for an organization account
Enable two-step verification on your Google account. Google now requires this for all Play Console users
In 2025, Google introduced mandatory developer identity verification. Starting in late 2026, apps must be registered by a verified developer to be installed on Android devices in several regions, with a global rollout to follow. Make sure your legal name and address are accurate during registration
Account approval typically takes a few hours to a few days. If there are any issues with identity verification, expect it to take longer.
Your store listing is your app's marketing face. Here's everything you need to prepare:
Primary app name (30 characters maximum)
Short description (80 characters)
High-resolution app icon (512x512 pixels, 32-bit PNG format, Max Size 1mb)
Feature graphic (1024x500 pixels for the Play Store banner)
Full app description (maximum 4,000 characters) explaining features, benefits, and use cases
Recent changes section (what's new in this version)
Tagline that captures your app's unique value proposition
Minimum 2 screenshots, maximum 8 screenshots
Screenshots should be in portrait orientation (1080x1920 pixels) or landscape (1920x1080 pixels)
Highlight key features in screenshots with text overlays
Optional: app preview video (15-30 seconds showing your app in action)
Optional: promotional graphic (up to 1024x500 pixels)
Select primary category (e.g., Games, Productivity, Health & Fitness)
Select secondary category if applicable
Content rating questionnaire (required by Google Play)
Privacy policy URL (required if your app collects any user data)
Target country/region selection
Supported languages (can add multiple)
Contact email for user support inquiries
Website link (optional but recommended)
Price (free or paid)
Countries where your app will be available
Device compatibility (ensure it matches your build requirements)
Android version targeting (minimum and target API levels)
Review all permissions requested by your app
Provide clear explanations for why each permission is necessary
Content declaration (specify if your app contains ads, in-app purchases, etc.)
Use your app name strategically—include a primary keyword if possible, without making it awkward. Your app description should start strong with the most compelling benefit in the first 1-2 sentences. Include relevant keywords naturally throughout your description, but avoid keyword stuffing, which violates policies.
Screenshots matter significantly—your first two screenshots determine whether users continue viewing. Each screenshot should highlight one key feature and include clear, readable text overlays that explain the benefits rather than just describe the features.
If included, your preview video should showcase your app's best features in action. Users who watch videos are 70% more likely to download your app, so invest in a professionally produced video if your app is complex.
Ratings and reviews heavily influence discoverability. Encourage users to leave reviews, respond professionally to all feedback, and fix bugs quickly. Apps with higher ratings rank better and convert more visitors into users.
Your store listing is the first thing most users read before deciding whether to download your app. Here is how to make it work harder for you.
1. App name: Include your most important keyword naturally. For example, "Budget Tracker: Expense Manager" tells users and Google exactly what your app does. Do not stuff it with multiple keywords. Keep it under 30 characters.
2. Short description: Write this for the user, not the algorithm. Focus on the single biggest benefit your app offers. For example, "Track every expense in seconds, no spreadsheets needed."
3. Full description: Start with your most important keywords in the first two or three sentences, since this is the part Google indexes most heavily. Describe features, benefits, and who the app is for. Write in the language your users actually use. If your app targets US users, use American English and terminology your audience recognizes.
4. Screenshots: Do not just show the app interface. Add short caption overlays that highlight key features. Screenshots with context text consistently outperform plain interface screenshots.
5. Ratings and reviews: Actively ask satisfied users to leave a review. Apps with more positive reviews rank higher in the Play Store search results. Respond to negative reviews professionally, since other users read your responses before deciding to download.
Once your listing is complete, upload your signed App Bundle or APK. Google Play Console automatically validates your upload and checks for common issues. Review the validation report and fix any identified problems.
Complete the content rating questionnaire if you haven't already. This determines age-appropriate categorization for your app.
Review all information one final time to ensure accuracy. Check that screenshots are clear, descriptions match your app's functionality, and all required fields are complete.
Submit your app for review. In 2026, most standard apps are reviewed within 1–3 days, though some may take longer depending on risk level. Google will send an email notification of approval or rejection, including specific reasons if changes are required.
For detailed technical instructions, consult Google's official publishing documentation.
Publishing your app marks the beginning, not the end. Without active promotion, most apps languish with minimal downloads.
To succeed, develop a launch marketing strategy before publication. Monitor user reviews and respond professionally to feedback. Track analytics to understand user behavior and identify priorities for future development. Update regularly to show your app is actively maintained and improve app store ranking.
App Store Optimization is how apps improve visibility in app store search results—essentially the SEO of mobile apps. In 2026, 63% of app discovery happens through organic search within the app store.
App Title - Your most important ranking factor; include primary keyword naturally.
Keywords - Research high-volume, low-competition keywords your users actually search for.
Description - Start strong with key benefit in first 2-3 lines; use keywords naturally without stuffing.
Screenshots - Your first 2 screenshots are critical; highlight one feature per screenshot with clear text overlays.
Preview Video - Optional but powerful; users who watch videos are 70% more likely to download.
App Icon - Make it distinctive and clear at small sizes; it appears in search results and home screens.
Ratings & Reviews - Heavily influence ranking algorithms; encourage positive reviews and respond to feedback.
Regular Updates - Signal active maintenance; each update provides an opportunity to optimize the listing with new keywords.
Permissions - Only request necessary permissions; excessive permissions trigger rejections and user distrust.
Building and publishing an Android app on the Google Play Store requires attention to technical details, security best practices, and strategic planning. Each step we've covered, from signing keys to manifest configuration, serves a specific purpose in creating a secure, high-quality app that users trust and Google promotes.
The good news is that the process has become more streamlined in 2026, with better tooling and clearer guidelines than ever before. Yet the fundamentals remain unchanged: sign your app correctly, configure it properly, optimize the user experience, and support it actively after launch.
If navigating these technical requirements feels overwhelming, or if you'd prefer expert guidance throughout the process, Cynoteck Technology Solutions specializes in Android app development and Google Play Store publishing.
Our team brings proven experience building, optimizing, and successfully launching applications across the Google Play ecosystem. We handle technical implementation, ensure compliance with current requirements, and help you plan effective launch strategies that maximize user acquisition.
Whether you're launching your first app or publishing your tenth, partnering with experienced Android developers ensures your app gets the attention it deserves.
Explore our Android mobile app development services and discover how we help businesses bring their app ideas to life with quality and confidence.
Our Android specialists are here to guide you through every step — from build to Play Store approval.
Let’s Talk About Your App
A: Most app submissions receive approval within 24 hours of submission. However, apps with high-risk features, complex permission requests, or policy violations may take longer to process. Ensure your app complies with all Google Play policies to avoid review delays.
A: Absolutely. In fact, regular updates are expected. Each update requires a new version code number. Use the same signing key you used for your initial release—never change keys after publication, or you won't be able to update your app.
A: An App Bundle is a newer publishing format that Google Play uses to generate optimized APKs for each device configuration. Users automatically download smaller, device-specific APKs. Individual APKs give you more control but result in larger downloads for users. Google recommends App Bundles for most apps.
A: Review Google's policy center before submission. Avoid apps with misleading descriptions, excessive permissions, or privacy violations. Test your app thoroughly on different devices and Android versions. Include a functional privacy policy if you collect any user data.
A: No. The applicationId in your build.gradle is permanent. Choose your package name carefully before initial publication. Changing it would require publishing it as a new app, resulting in the loss of your reviews, ratings, and user base.
A: Read the rejection reason carefully—Google provides specific feedback explaining why your app didn't meet policies. Address the issues, make necessary changes, and resubmit. Most rejections are fixable with a proper understanding of the requirements.
A: For new developers with personal accounts, expect the full process to take 2 to 4 weeks. This includes account approval, the mandatory 14-day closed testing period, and Google's app review. Organization accounts are typically faster, with first submissions going live in 3 to 7 days. For established accounts, updates usually go live in under 24 hours.
A: Publishing is free after the one-time $25 developer registration fee. There are no annual fees or per-app charges. If you sell paid apps or in-app purchases, Google takes a 15% revenue share on the first $1 million in annual earnings, and 30% after that.
A: An APK (Android Package) is the old format that contained the full app for all devices. An AAB (Android App Bundle) is the newer format that Google requires for all new apps. When you upload an AAB, Google generates a smaller, optimized version of your app for each specific device. This means users get faster downloads and less storage usage.
A: As of August 31, 2026, all new apps and updates must target Android 16 (API level 36) or higher. You set this value as targetSdk 36 in your Gradle build file. Apps on Wear OS and Android TV must target at least Android 15 (API level 35). Failing to meet this requirement will block your submission.
A: Yes. Both Flutter and React Native apps can be published on Google Play. Flutter uses the command flutter build appbundle to generate the required AAB file. React Native uses ./gradlew bundleRelease. The rest of the publishing process in Play Console is identical to native Android apps.
A: Yes, if your app collects any user data, including names, emails, location, or device identifiers. You must provide a URL to a public privacy policy page. This is also required for apps that target children. Many free privacy policy generators are available online if you do not have a legal team.
A: Google will send you an email to your registered developer account explaining the reason for rejection. Common reasons include targeting an outdated API level, an incomplete Data Safety declaration, misleading descriptions, or a missing privacy policy. Fix the issue described and resubmit. Most rejections can be resolved in one or two attempts.

Mobile healthcare apps improve patient care by enabling remote monitoring, timely reminders, secure data access, better communication, and cost-efficient healthcare services through mHealth technology.
B2B apps help businesses streamline operations, enable on-the-go access to data, improve client engagement, support omnichannel sales, and drive scalable revenue by simplifying complex business workflows.
We are more than just developers and consultants—we are your partners in navigating the digital landscape. Let us be the engine behind your next big success while you focus on your core vision.
Explore Opportunities!
 Mobile App Development Cost Breakdown by App Type, Features, and Complexity (2026).png)